
Where to find Scalpels and Surgical Scalpels in Fallout 76 - Internal Spawns
- Duchess Flame
- Oct 21, 2025
- 11 min read


Image Credit:
Used For
Night at the Morgue Mini Season – Collect 5 Scalpels or Surgical Scalpels while wearing a Costume.
Farming Tips and Tricks
Scalpels are a per-server, pick-up history, world spawn item.
This means they will only spawn once per location per server. If another player collects it before you, you won’t be able to collect it on the same server. If the scalpel isn’t there for you and you haven’t collected it from that location before, try server hopping or switching to a private server to look again.
However, if you’ve already collected a scalpel from that location and it isn’t there when you return, you’ll need to refresh your pick-up history list before it can respawn for you.
If you’re still unsure or would like more details, check out my How Spawns Work in Fallout 76 guide, which you can find here.
Avoid using grenades or explosive weapons, as the scalpels can shift position. Since they are so small, you’ll have very little chance of finding them again.
Most of the internal spawns are locked behind questlines, so if you are up to date with all the content, you will be fine.
Fixed Spawn Locations
Vault 96
11x Spawns
Note: You must have completed the Brotherhood Questline Steel Dawn and Steel Reign to access these spawns. Alternatively, these spawns can be accessed during Daily Ops.
From the fast travel point, run straight toward the large red platform ahead. You can either jetpack up or take the stairs to reach the top.
Once you’re on the platform, face north and you’ll see the open vault door. Walk over and interact with it to enter.
Inside, veer right and follow the path down until you reach the ground level. Face north again and stop at the top of the second set of stairs. Do not go all the way down. Turn left and follow the walkway around until you reach the door marked “Overseer.”
Go up the stairs and into the Overseer’s Office. Face south and walk to the window overlooking the area below. Look down and you’ll find two Scalpels next to a metal tray on the desk.

Turn around, exit the room, and stop at the bottom of the stairs. Turn left and walk forward until you reach the staircase in the center of the room. Go down the stairs and stop at the bottom.
Face east and walk forward, veering slightly right so you enter the corridor. Stop at the door marked “Living Quarters B” and go inside.
The first scalpel is stuck into the teddy bear under the metal desk. The second is beside the metal tray on the middle bench next to the animal skull.

Bonus tip: check the room directly opposite, marked “Living Quarters C.” You’ll find a few bags of fertilizer inside.
Exit "Living Quarters B" and face west. Walk forward and climb the ice hill until you’re back on the top floor. Turn left, take a few steps forward, and stop beside the pile of white metal Vault-Tec crates on your left.
Face east and run forward through the door marked “Research Wing.” Continue straight until you reach the wall, then turn right.
Follow the path around until you reach the end. When you hit the wall, turn north and drop down to the ground floor.
Face northwest and head to the door marked “Imaging Lab.” Go inside, face southwest, and walk over to the table with the brown doctor’s bag on it. The Scalpel is beside the body, and the blue bone cutter on the table.

Face north and walk over to the metal bench on the far side of the room. The next scalpel is lying on the bench beside the corpse.

Turn to face southeast and climb onto the white consoles ahead of you. Once on top, face southwest. You’ll see a body lying on a table in front of you. There’s another scalpel on the table, but it’s just a prop and can not be interacted with.

Still standing on top of the white consoles, turn until you’re facing north. Jump, or use a jetpack, to reach the upper floor directly ahead.
Face west and walk over to the corpse lying on the center table. The scalpel is on the table near the front, resting partially under the corpse’s arm.

Face east and walk forward. Turn left and go through the door marked Cryogenics Wing. Continue north along the corridor and stop at the top of the stairs ahead. Turn north again and follow the path around, passing the red console on your left and the robot assembly tube on your right. Stop at the door beside the yellow cart.
Go through the door and drop down to the ground floor.
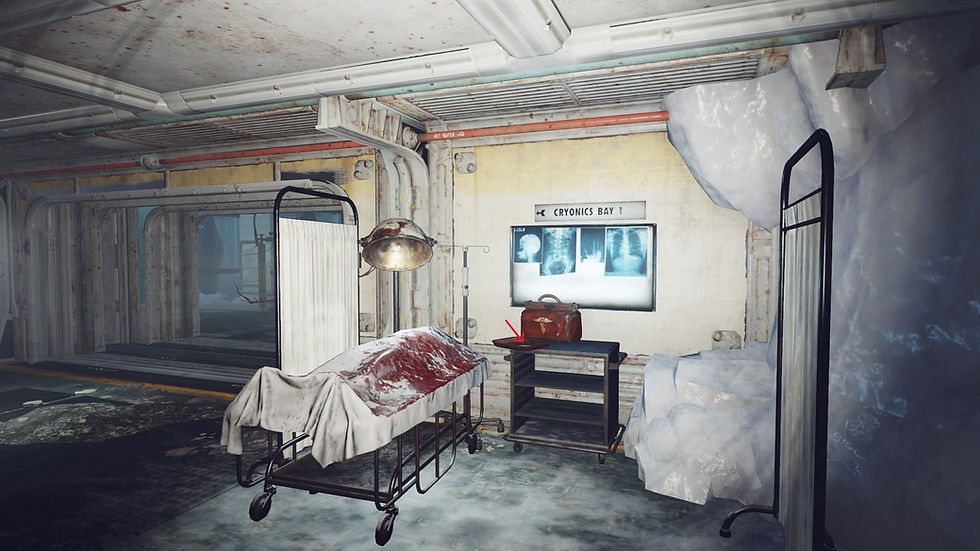
Face west and walk over to the hospital beds and corpses.
The first scalpel is on the metal tray beside the brown doctor’s bag on the table to your right.
Next, face south and move to the metal cart on the far side of the hospital bed in front of you.
The second scalpel is on the metal tray on top of that cart.

Face west and look up. Take a few steps back, then jump up onto the floor above you. Still facing west, walk forward through the door and follow the ice path down until you reach the ground. On your right, you’ll see a corpse under a sheet on a bed, with a metal cart and a brown doctor’s bag beside it. Walk over to the metal cart, and the scalpel is on the metal tray.
Face west and look up. Walk backward a few steps, then jump up onto the floor above you. Still facing west, walk straight ahead and follow the path into the door marked “Reactor Chamber.” Move forward and stop at the doorway in the middle of the room. Turn left, walk forward a few steps, then turn right and drop down to the ground floor.
In front of you and slightly to the right is a Vault Dweller corpse on a hospital bed. Walk over to the corpse, and the final scalpel is on the metal tray beside the blue bone cutter, next to the corpse’s head on the bed.

Arktos Pharma Biome Lab
6x Spawns
From the spawn-in location, run to the main building and enter through the door beneath the stairs.
Head behind the reception desk and take the elevator down to the Biome Lab.
When you exit the elevator, walk straight ahead and stop at the pile of metal and wooden crates on your right.
Face east and you will see a sign that says “Animal Research” on the wall. Walk toward it and go through the doorway beside the sign.
Turn right. The first two scalpels are on the metal bench to your left, just behind the skeleton.

From the scalpels above, face North and walk over to the cage wall. Open the door on your right and walk inside.
Face East and walk over to the bench in front of you. The next scalpel will be on the edge, on the right.

Pop those chems and repair your armour, then head out to pick a fight with some robots before tracking down the last two spawns.
Exit the caged room and turn west. Walk forward and stop when you reach the bottom of the stairs on the far side of the room.
Face southwest and walk over to the large pipe. Turn west again and keep walking until you’re standing in the middle of Habitat C. Jump onto the feeding trough and face west once more. You’ll see a set of stairs and a building ahead of you. Run over, go up the stairs, and enter the building.
Deal with the Assaultron, then find the red console in the middle of the room. Behind it is a metal bench. The final scalpels are at the far end of that bench, near the microscope.

Transmission Station 1AT-U03 (Enclave Research Facility)
6x Spawns
You must have completed the original Enclave questline and obtained the General rank to access this location.
You will need lock pick and hacker perk cards at this location.
From the spawn location, run forward and either jump over or open the gate. Use the hand scanner on the left side of the door to enter the building, then walk to the tube in the corner and interact with the keypad to enter the instance.
After exiting the elevator, walk forward and stop at the bottom of the stairs. Turn left and walk over to the white door with a terminal mounted beside it. Unlock the door, step inside, and walk all the way to the end of the room. Turn left again and head toward the cabinet and shelves along the west wall.
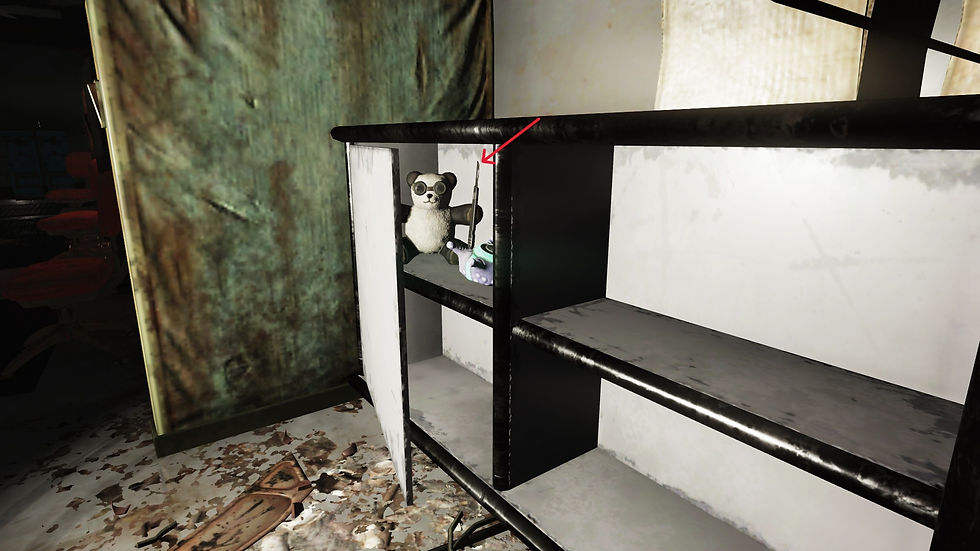
The scalpel is being held by an Imported Panda Bear tucked behind the cupboard door.
Due to item collisions, you’ll need to crouch into sneak mode and carefully line your crosshair up with the scalpel through the gap in the door to pick it up.

Turn to face southeast and open the door in front of you using the red button on the right-hand side. Follow the hallway around and down, then open the door at the bottom.
Face north and walk over to the tables on your left.
The first scalpel is on the table beside the microscope, and the second scalpel is on the next table beside the blue bone cutter.

From the spawn above, face southeast and walk straight past the glass tubes until you reach the white consoles and the red gas tank on the other side. Turn left and follow the row of white consoles to the end. Stop at the small green metal table and you’ll find the next scalpel on the metal tray on top of it.

From the spawn above, go up the stairs and walk to the white door beside the bookcase. Enter the next room and head to the table with the radstag corpse on it. The scalpel is near the head of the corpse, but it is only a prop and cannot be interacted with.

Turn around and exit the room, then walk toward the white door with the terminal on the south wall. Open the door, turn right, walk forward, and drop down to the ground floor.
Keep walking straight and jump up to the floor above you. Turn left and head toward the green door. Open it, follow the path around, and continue walking until you reach the broken catwalk. Drop down to the ground floor.
Walk straight ahead and open the door marked "A-05." Follow the room around until you reach the lab on the other side. Walk straight and stop at the blue water cooler on your right with a wine bottle inside it (can’t blame them for that). Turn and open the next door, then follow the room around. Stop at the door at the end and face northwest. You’ll see a radscorpion corpse on a metal table on the platform in front of you. The scalpel is sticking into the middle of the radscorpion’s body.

Lewisburg (Van Lowe Taxidermy)
3x Spawns
From the spawn in location, follow the road and take the first left. Stop at the building on the corner of the first street on your right, then turn and enter the Van Lowe Taxidermy building.
Once inside, face southeast and walk toward the wall with the “Supplies” sign. The first two scalpels are on the second shelf to the right, resting on a metal tray.

You’ll need to have completed the Sheepsquatch questline to access this next spawn.
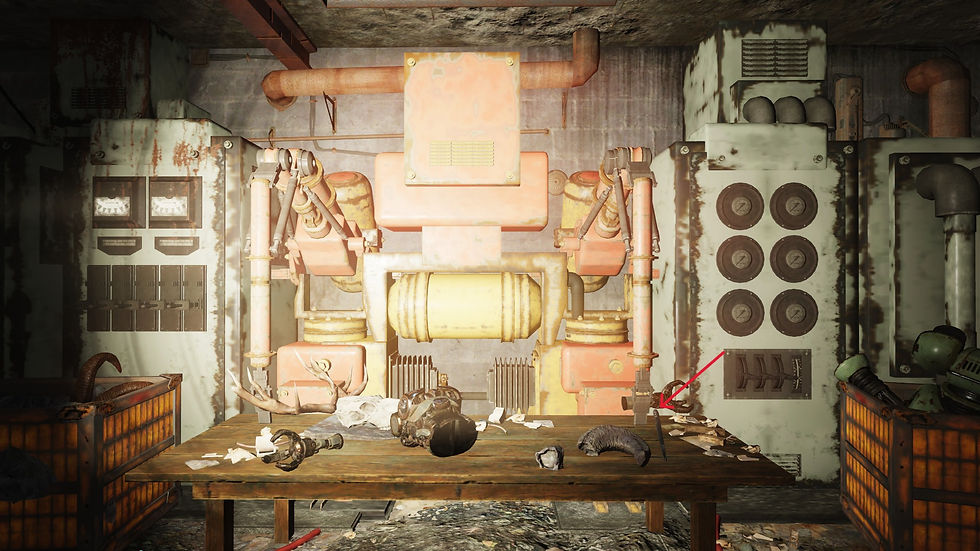
From the previous location, face south and head to the door behind the counter. Follow the stairs all the way down to the basement, then open the secret door using the “Laundry Day” pin. Once it’s open, follow the path around until you reach the red and yellow machine on the north wall. The last scalpel will be sticking out of the table on the right.
Ella Ames' Bunker
3x Spawns
From the spawn-in point, run over and enter Ella’s bunker.
Follow the stairs down until you reach the kitchen. Turn east and continue down the next set of stairs.
At the bottom, turn right and follow the hallway all the way to the end.
The first scalpel is on the ground between the chemistry bench and the metal workbench.
The second and third scalpels are on the metal workbench. One is in the molerat, and the other is resting on the tray to the left.

Shining Creek Cavern (Vault 63 Organics Sector)
3x Spawns
Note: You must have completed the Skyline Valley and Vault 63 Questlines to access these spawns.
From the spawn location, head toward the map marker and enter the cave.
Face east and follow the path until you reach the large column in the center of the next room. After dealing with the radscorpions, face east again and either jump or use your jetpack to climb up to the path above.
Turn north and walk to the gate. Unlock it using the Cave Gate Key, then follow the path until you reach the cream-and-yellow trailer. Stay on the path to your left and continue uphill. At the top, face east and walk through the doorway.
Keep moving straight ahead and stop in the middle of the room. Face east once more and enter the pipe labeled “Vault 63 Organics Sector.”
Face east and walk straight up the stairs until you reach the door labeled “Chemistry Lab.” Open the door and move to the center of the room.
Go up the stairs on your left and open the door marked “Pharmaceutical R&D.” Walk forward and open the first door on your left labeled “Clinical Trials Chamber 1.” Head to the back of the room and into the caged area.
Face north, open the door marked “Test Chamber 1,” and follow the path around into the room. The first scalpel is on the metal cart at the end of the bed, next to the metal tray.

Turn around and walk back to the foyer, the room with the garden in the middle under the glass floor. Stand in the middle of the glass floor and face East. Jump up to the floor above and walk forward into the next room. turn right and go down the stairs. open the door at the bottom of the stairs using the Vault 63 Chem Wing Keycard.
Return to the Foyer and stand next to the broken statue. Face East and walk toward the "Human Biology Wing," then go down the stairs. Turn left and enter "Biology Lab 1." Face North and walk to the table in front of you. The third scalpel is in the green tool roll next to the magazine spawn.
Note that this spawn is only a prop and cannot be collected or interacted with.

Dark Hollow Manor (Vault 63 - Atrium Upper Level)
3x Spawns
Note: You must have completed the Skyline Valley and Vault 63 Questlines to access these spawns.
From the spawn-in point, open the elevator door and head straight ahead into the Overseer’s office. Turn north and open the door directly in front of you. Continue straight, open the next door, then turn right and take the stairs down.
At the bottom, move forward a few steps, then turn left into the clinic. Face north and check the first metal shelf on your right, the scalpel is on the second shelf from the bottom.
Face west and walk to the second metal shelf. You’ll find another scalpel on the second shelf from the bottom.

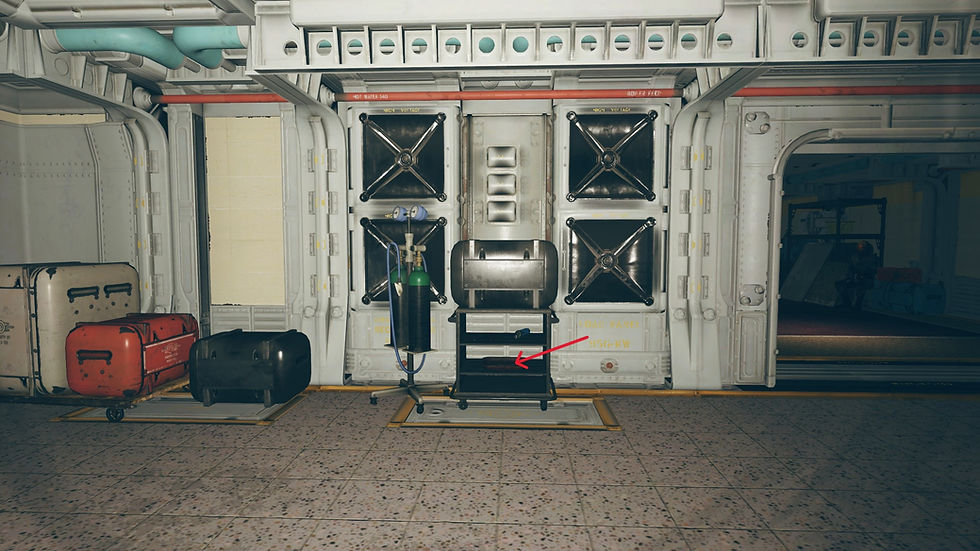
Turn around and leave the room. Turn left and follow the hallway around until you spot a cluster of white, red, and metal crates along the east wall. Beside the crates, you’ll see some oxygen tanks and a metal cart.
The scalpel is sitting on the metal tray, on the middle shelf of that cart.
Organ Cave North
3x Spawns
From the spawn-in point, run forward and enter Organ Cave through the door ahead.
Check the rare baseball bat spawn next to the candle, then veer right and follow the tunnel until you reach the large open room.
Turn right and cross the bridge.
Keep going straight into the tunnel and then turn left.
Take the first right and follow the path until you see the raider cages and fire barrel on your right.
Behind the cages and the fire barrel is a metal shelf.
The scalpels are on the bottom shelf next to the emergency aid kit.


Hey there, I'm Kat, also known as Duchess!
I'm an Aussie data miner who creates guides for farming, events, and food buffs in Fallout 76.
I firmly believe that knowledge should be accessible to everyone, so my guides will always be free. However, maintaining a website and using photo and video editing software can be costly.
If you find my guides useful, here are a few ways you can support me:
- Share My Guides: Help your fellow vault dwellers by sharing my guides.
- Follow Me on Social Media: Keep up with my latest updates by following me on social media.
- One-Time Donation: Buy me a coffee.
- Monthly Contribution: Become a regular supporter by subscribing to my Ko-fi page.
Every bit of support helps cover the costs of creating these guides and maybe even gets me a cup of coffee or three ;)
Thanks for your support!


Comments