
Where to find and how to farm for Starlight Berries in Fallout 76
- Duchess Flame
- May 8, 2022
- 44 min read

Updated: Jul 28, 2024

The Starlight Berry farming guide that you have been searching for, all your Fallout 76 life is finally here.
With 300+ plants well documented, combined with thoroughly tested routes, finding berries will be the least of your problems from now on.
This route is intended to be run from start to finish. It does however depend on how many Starlight Berries you need. If you only need a handful then only run part of the route, if you need them in bulk then start from the top and work your way to the end.
Fun and useful fact: Starlight Berry bushes are referred to as creepers in the game files. In real life, a creeper needs a form of support, be it a tree, a power pole, or a lamp post. If you can’t find a particular bush while using this guide, keep the above information in mind, as generally, the bush will be growing at the base of a tree or power pole in the area.
To make things simple, Starlight Berries will now be referred to as SLB, for the rest of the guide.
Used for
Food and Chem Buffs
Berry Mentats
Infused Soot Flower Tea
Seared Venison w/Berries
Starlight Berry Cobbler
Sweet Blackberry Tea
Sweet Labrador Tea
Sweet Mutfruit Tea
Tasty Mutant Hound Stew

Farming Tips and Tricks
The following perk cards, magazines, and/or backpack mods will increase your yields.
Starlight Berries have a 35% chance to spawn and are affected by your pick-up history list.

What is Verdant Season Guide
How spawns work Guide.
What plants work with Backwoodsman # 4 List.
Honourable mentions
3 SLB bushes can be found in Vault 94.
7 single berries can be found throughout the basement and ground floor inside Vault Tec agricultural research centre.
1 single berry can be found on the side alter, in Point Pleasant, on the roof top where the Mothman throne can be found.
Fixed Spawn Locations
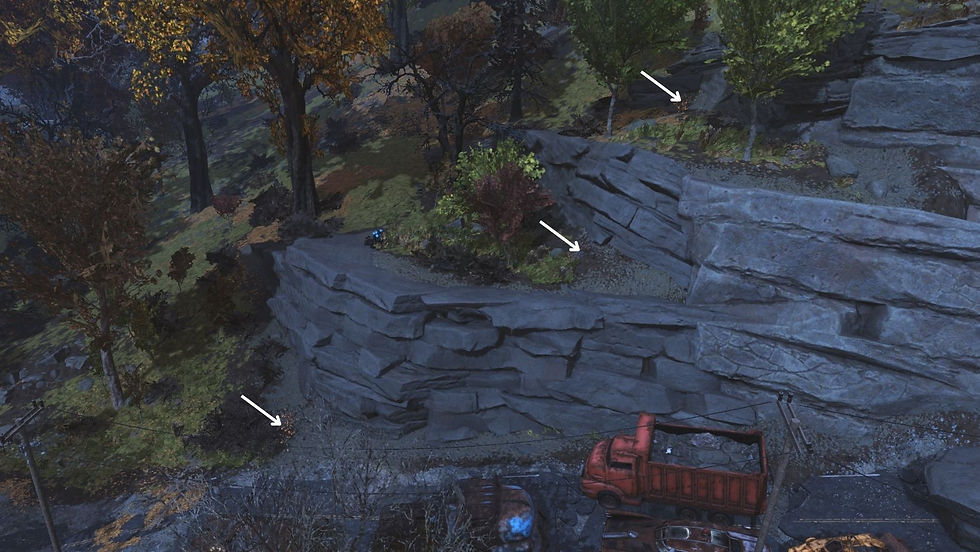
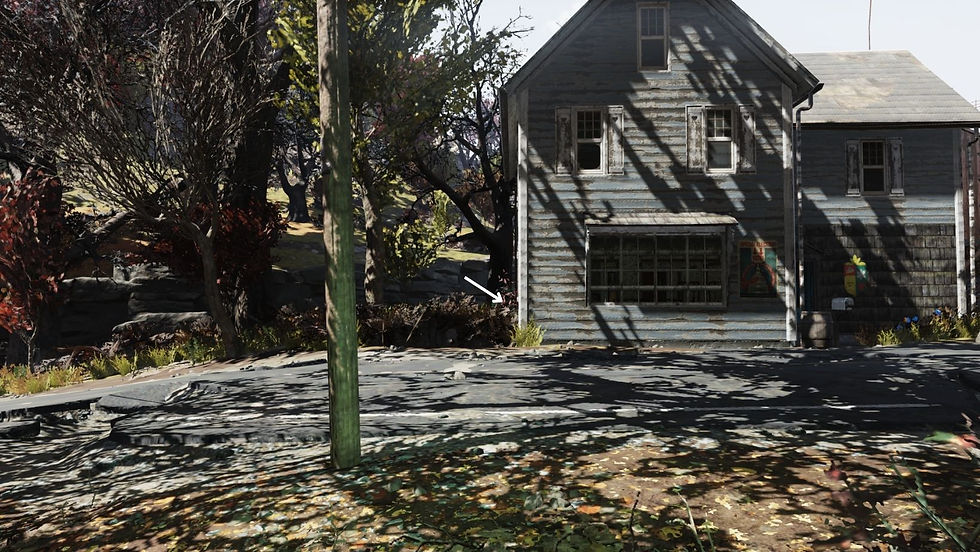
I have done my best to provide accurate directions to every Starlight Berry bush, however for some, you may need to refer to the photo to find them, as there is no landmark or map marker in the area to use as a point of reference.
Note: Soot flowers, Mutfruit, Fire caps, Silt Beans, and Rhododendron flowers all grow along these routes. It is worth collecting them as you are harvesting the starlight berries.
Where to find and how to farm for Starlight Berries Video can be found here.
Tyler County Fairgrounds (9)

From the fast travel point, turn slightly left until you are in line with the green and red spaceship playground as pictured below. Run down the hill and jump on top of the spaceship. Turn until you are facing North East. The first (1) SLB bush will be on the corner of the shed, in front of you.

From the bush above, turn until you are facing the big blue trailer. Run forward and jump over or walk around the blue trailer. Keep walking forward, until you are standing next to the red dump truck trailer and the fence.
Follow the fence line around (North ish) until you get to a power pole on the corner. The next (1) SLB bush will be on the corner, at the bottom of the power pole.
From the power pole, turn and face East. Walk forward a few steps towards the yellow car for the next (1) SLB bush.

From the bush above, face North and head towards the parking lot full of cars. You can either jump the fence or walk around. Stand in the middle of the parking lot and face East. There should be a fence and a green and white striped tent in front of you. Walk forward until you are standing at the fence. At the large green dumpster, turn and face North. The next (1) SLB bush will be at the bottom of the tree directly in front of you.

Turn and face West. Walk forward until you are standing on the main road. Turn left and follow the road around towards the Tyler County Dirt track (Workshop). At the T junction, continue straight until you have the white brick wall on your left. As you walk past the white brick wall, you will see a rusty van on your right. There is a (1) SLB bush at the back of the rusty van.
Back out on the main road, with the white brick wall on your left, walk forward a few metres until you see a truck next to a power pole on the corner. The next (1) SLB bush is at the bottom of the power pole.

Continue to follow the road West. Once you pass 4 cars on your left, there will be a large tree on the corner of the main road and a dirt road on your left. The next (1) SLB bush is at the bottom of the big tree.

Once you have harvested the berries from the last bush, keep following the main road along. At the first power pole on your left, there are two (2) more SLB bushes.

Anchor Farm (18)
Fast travel to Tyler County Fairground.
From the fast travel point, turn South East and follow the road. Go past the red and yellow cars and the first (1) SLB bush is on your left at the base of the power pole near the black car.

Follow the road up, past the truck and car accident. At the bottom of the power pole on your right, is another (1) SLB bush.

Keep following the road up, until you see the turn-off to Anchor Farm. There will be an orange ute/pickup truck on your right and an APC/Tank on your left. Turn and follow the dirt road down, past the APC/tank, until you get to an open shed with an armour bench inside. Jump over the shed or walk around the shed to find the next (1) SLB bush, on the corner of the fence around the windmill.

From the bush above, turn around and run back up the dirt road. On the left hand side of the APC/Tank, at the bottom of the power pole, on the corner, is a (1) SLB bush. From there, run across the road and hit the other (1) SLB bush at the bottom of that power pole.

Now, you guessed it, turn southeast and continue walking up the road.
The next (1) SLB bush is on your right, at the bottom of the power pole.

Further up the road, opposite a rusty ute/pickup truck, is another (1) SLB bush, at the bottom of a power pole on your right.

Keep going up the road. You will pass some crashed cars and then the road will curve. Keep following that road and keep looking at those power poles. Just past the curve in the road, the next (1) SLB bush is on your right at the bottom of the power pole.

Past the pink car, with the Blood Eagle and his dog, is another power pole on your right and another (1) SLB bush.

Keep following the road, but instead of following it around the curve, keep walking straight. You will walk past large flat grey rocks on your right, and an NPC on your left. Keep walking until you get to the radio tower at the end. There is one (1) SLB bush next to the yellow box, against the fence that is around the tower.

From there, turn around and walk back up the dirt road, toward the main road. There is another (1) SLB bush at the bottom of the power pole on your right.

Still on the dirt road, another one (1) SLB bush can be found at the bottom of the power pole on your right.

The next (1) SLB bush is on the corner of the dirt road and the main road, at the bottom of the power pole on your right.

By now you should be standing back on the main road, heading up to Vault 76. On the left hand side of the road, after three cars, is another (1) SLB bush, at the bottom of the power pole.

Another (1) SLB bush, at the bottom of the power pole, on your left, further up the road. There should be a car slightly in front of the power pole and could be hiding the bush from view.

While walking up the road, look for the blue car that has stopped in the middle of the road. On your left, at the bottom of the power pole, is another (1) SLB bush.

From this point, you can choose to run or to fast-travel to Vault 76.

Once you are at Vault 76, turn around so you are facing the vault. Turn East and walk forward until you are standing on the edge of the paving and the dirt path and then turn North East. You will need to walk around the edge of the rock face. Maintain a northeast direction once you have passed the rock face. Keep an eye on your left, for some ruined wooden buildings and a blue tent. Once you see them, turn and head towards them. Once you get to the ruins, head towards the main building. There will be two (2) SLB bushes out the front.

Point Pleasant (13)

From the fast travel point, turn and face East. There should be a power pole in front of you and a large metal power pylon in the distance. Run towards the power pylon until you hit the rock wall. At the rock face, turn North West and walk forward, looking on your left while doing so. The first (1) SLB bush is at the bottom of the tree.

From that bush, turn back around to the rock wall and either jetpack up or run around the rock face until you reach the large metal power pylon that is at the top of the rock wall. The next (1) SLB bush is on the front side of the pylon, against the concrete base.

Fast travel to Marigold Pavilion.

From the spawn-in point, run towards the building. On the left-hand side of the building is a dirt path. Follow the dirt path down, until you get to the back of the building. Keep following the path down, past the back of the building and you will see a little wooden help shelter on your left. At the shelter, face North East and you will see the next (1) SLB bush in front of you, at the bottom of a tree.

From the bush above, follow the dirt path back up towards the building and stop at the second picnic table. Turn West and walk forward until you get to a small cliff top. Looking directly West, you will see the top of a large white metal power pylon. Walk forward towards the pylon and pass a tree on your right. Stop at the top of the cliff. Turn North East and you will see the (1) SLB bush at the base of the tree in front of you.

Stand inside the SLB bush above and face South. Walk forward until you see a large gap between the rocks/cliffs on your right. Turn West and run towards the large white metal power pylon. Drop down the cliff and follow the valley down towards the large white metal power pylon. The (1) SLB bush will be on your right, just before some trees.

From the SLB bush above, face West and run towards Point Pleasant. You will drop down some small cliffs while going down the hill. As you get closer to Point Pleasant, you will see a large white metal power pylon. Adjust your route if necessary and head towards the base of the power pylon. Next to one of the concrete blocks on your right, is a (1) SLB bush.

From the above bush, stand inside the bush and face North. Take a few steps forward until you are standing in a small dirt clearing. In the dirt clearing is a log and three grey stones. Turn and face the stones and the next (1) SLB bush will be behind the stones.
From this bush, turn and face North West. Walk forward towards the road, with the large tree on your right. You will pass the next two (2) SLB bushes on your right, with the last bush being on the edge of the road.

From the last bush above, you should now be standing in the middle of the road. Turn so your back is to Point Pleasant and start walking down the road.
The next (1) SLB bush will be on the second power pole, on your right.
Continue to follow the road along, past another power pole, and the other (1) SLB bush will be at the base of a tree, behind the pile of wooden logs.

Go back out onto the main road and walk towards the truck that is parked in the middle of the road. The next (1) SLB bush is against a power pole, next to the cab of the truck.

The last SLB bush for this location is down the road. Follow the road, past the car and trailer and the 81 sign. Count the power poles, the last (1) SLB bush is behind the second power pole from the 81 sign on your right.

Black Mountain Ordnance Works (27)

From the fast travel point, turn around and walk up the road. Stick to the white line, on the left edge of the road. After a few steps, you will see an average-sized tree on the left edge of the road. There will be two (2) SLB bushes just next to it.

Turn around and run back to Black Mountain Ordnance Works
Just after the car, the road will split into two. Stick to the road on the left-hand side. Cross over to the fence on the right-hand side. Follow the fence until you see a break in the fence, next to a red and white sign that says “This area is closed”. Enter through the break in the fence, turn left, and head towards the yellow car in the car park. Stand at the front of the yellow car and look East. There will be four (4) SLB bushes in front of you

From the last/furthest away SLB bush. Stand in the middle of the bush and face South. Walk forward until you are on the road, the next (1) SLB bush should be right next to you on your left. Directly in front of you and across the road is the next (1) SLB bush.
Turn southeast and walk forward a few steps to reach the next (1) SLB bush. From that bush, turn around and head back towards the dirt road. Follow the dirt road down towards the front office, and grab the last two (2) SLB bushes on your left.

From the last SLB bush, continue down the road and grab the single (1) SLB bush on the way to the front office.
Stand inside the last bush and face South. Walk straight forward to the tree that is on the corner of the ruined building. The last (1) SLB bush is at the base of that tree.

From the last SLB bush, turn North and run forward, back through the gap in the fence, until you are standing out on the main road. Once on the road, face East and walk up the road.
Count power poles on your left, at the second power pole there is a large flattish grey rock, beyond that is a large tree, walk over and stand in front of the tree. At the tree, turn and face SSE and walk forward a few steps. The (1) SLB bush will be in front of you.

Stand in the middle of the bush and face East. Walk forward and kill the three Blood Eagles that are standing in front of Dome # 4. Stand at the door of the Dome and face South, walk forward 5 meters or so and the last (1) SLB bush should be in front of you.

Walk forward until you are back on the main road. Follow the road East for a while until you see a billboard, a yellow tower, and a large tree on your left. Opposite the large tree is a power pole and a 45 MPH sign. The first (1) SLB bush is at the base of the power pole, on your right.

Continue to walk up the road. Just past the red truck will be a dirt road on your left. On the corner of the dirt road, at the bottom of the pole, will be another (1) SLB bush.

Turn left onto the dirt road and walk forward. On the corner of the junkyard and the dirt road, on your left, at the bottom of the pole, is another (1) SLB bush.

From the bush above, face North-ish and walk towards the white ice box. Jump over or walk around the ice box, towards the pile of wooden logs. Turn slightly so you are heading towards the right end of the log pile. The next (1) SBL bush is on the corner of the gap in the fence, behind the pile of wood logs.
From that bush, stand so the junkyard fence is on your left. Face West and follow the fence around until you get to the corner. You should be facing a Nuka Cola billboard, with a (1) SLB bush on your left and a potential Firecap at your feet.

From there, walk to the base of the Nuka Cola billboard, for another (2) SLB bushes.

From the billboard, walk straight so you are standing back out on the main road. Turn and face South and start walking down the road again. Note the wooden fence on your left and the broken-down ute/truck on your right. Keep walking forward and the next (1) SLB bush is at the bottom of the power pole, at the end of the broken fence, on your left.

Continue to walk down the road and start counting power poles again. Not including the power pole from the last bush, walk forward til the third pole on your left. At the power pole, turn and face East. Turn slightly right and walk forward towards a really big tree. The (1) SLB bush is at the base of that really big tree.

Stop at the next power pole on your left. Next to the power pole is a large tree. Stand with your back to the tree and face West. Cross the road (look both ways before crossing) and keep walking straight. Pass a small tree on your left and the next (1) SLB bush is next to the next tree on your left.

Stand in the middle of the above bush, face East, and just run straight. Keep running, across the road and through the forest. Via left towards the rock/cliff face while running up the hill and the (1) SLB bush will be on your right.

For the next (1) SLB bush in this area, go back and stand on the main road, facing South. Walk forward and stop at the next power pole on your left.

Gilman Lumber Mill (9)
Fast travel to Gilman Lumber Mill.

The first three (3) SLB bushes are out the front of the main lumber mill building, in and around the parked cars. One bush is at the bottom of the power pole, the next one is at the bottom of the tree and the third is in front of the red truck.

From the last bush, jump over or walk around the fence, towards the right-hand side of the building, for the next two (2) SLB bushes.

From Gilman Lumber Mill, you can run or fast travel over to the Isolated Cabin. Walk around the outside of the cabin to find the two (2) SLB bushes that spawn here.

From the Isolated Cabin, run or fast travel to the Overseer’s camp near the Wayward.
Stand next to the Overseer’s cache and face South East. You should be able to see the first (1) SLB bush in front of you.

Stand inside the last bush and face South East. Walk forward in a straight line, past some Mutfruit trees and a large tree on your right. Keep walking forward in the southeast direction until you see a semi-circle of grey rocks, the next (1) SLB bush will be inside the circle.

Helvetia (10)

From the fast travel location, turn around and run up the road until you get to the first rusty car. Turn left and the first (1) SLB bush will be in front of you.
You can either Jetpack up or run around to the next level of the cliff to get to the next one (1) SLB bush.
To get to the third (1) SLB bush, either jetpack up or run around to the next level of the cliff.
Drop down the cliff side until you are standing at the bottom, in front of the red dump truck. Walk forward and follow the road down, over the bridge, until you get to a shed with multiple wood piles inside on your right, and on your left will be an undercover area/carport (4 poles and a roof).
Turn left and walk forward until you are standing under the undercover area/carport. Next to the undercover area is a very large tree. Walk over to the tree so it is on your right-hand side and then turn and face East.
Walk straight forward, you will pass a mailbox, a wooden sign, part of an airplane, and a possible raider NPC. Keep walking forward until you hit a rock face. The next (1) SLB bush will be on your right.
You can either jetpack up or run around to get to the next (1) SLB bush on the rock level directly above the last plant.

From the last bush above, turn and face East. Walk straight until you get to the base of a cliff face. Either Jetpack up or walk around to get to the next level of the cliff. The (1) SLB bush is against the rock face, near some airplane rubble.

Stand inside the last SLB bush and face East. You should be looking at a wall of rock. Turn right, hug the rock face on your left, and follow it around/up the hill. If you did it right then you should see part of the airplane turbine/engine on your right and the (1) SLB will be on your left.

From that SLB bush, jump down the cliff face and head back towards the main road of Helvetia. Stop at the T junction so the yellow “Freya's Haus restaurant” is on your right and a two-story grey building is on your left. Follow the road West for a few steps, then turn right at the dirt road and cross over the bridge, at the end of the bridge will be “The Honey Haus”.
Face the front door, the next (1) SLB bush will be against the wall on the right-hand side of the building.
Walk to the end of “The Honey Haus” and turn left. You should be facing a red two-story building, with a green tank at the back. Walk straight towards the green tank. The (1) SLB bush is in the corner between the green tank and the wall of the red building.

Go back out to the main road and stand at the T junction so the yellow “Freya's Haus restaurant” is on your left, and a two-story grey building is on your right. Turn right at the T junction and follow the road down a few meters until you get to the end of the two-story grey building. Turn right at the corner of the building and the last (1) SLB bush will be in front of you.
Mama Dolce’s Food Processing Plant (Morgantown) (36)

From the fast travel point, turn around and run down the road. Stop at the T junction and turn left. There should be a metal shed/building on your left. Head towards that building and the first (1) SLB bush is at the back of the building. If you are farming to make Sweet Mutfruit Tea, then there is a heap of Mutfruit bushes around this building as well.

From the SLB bush above, face West and walk back out to the main road. Turn left and run straight down the road until you get to a cross-section/intersection. On your right, on the corner are two (2) SLB bushes).

Turn right at the cross-section, go past the blue car, and stop at the bridge. There should be a power pole with a push bike against it on your left. Sticking to the left-hand side of the bridge, drop down and walk under the bridge to find three (3) SLB bushes.

While still under the bridge, turn North and walk up the road. Just before the first power pole on your right is another (1) SLB bush.
Stand inside the above-mentioned bush and face North. Walk straight forward, up the hill to find two (2) SLB bushes at the bottom of the large tree. While standing at the bottom of the tree, face North West and you will see the next (1) SLB bush in front of you.

Run back down the hill, onto the road, and stand under the bridge again. Face West and walk until you hit a wall of rock on your left. Continue to follow the rock wall around, do not go onto the road. At the end of the rock wall, turn right and walk forward. There will be three (3) SLB bushes in front of you.

From the three bushes above, face East, jump up the rocks, and go and stand on the bridge that had the SLB’s under it.
Face South and jump off the bridge. Follow the road in an Easterly direction for a few meters until you see a billboard on your right. Stand at the base of the billboard, face South, and run straight, over the river, until you get to another main road.
On the main road, turn left. There should be a large rock slide, covering half the road in front of you.
Stand on the top of the rock slide and face South East. Walk forward a meter, there should be a Rhododendron flower bush in front of you and a (1) SLB bush to the left of that.

From that bush, face East and go straight forward, you should see a grain silo and a farm in front of you, in the distance. Keep going forward in an Easterly direction and stop in the middle of the bridge facing the grain silo, on your left will be a red barn. Head towards the red barn, the (1) SLB bush will be at the end of the road, just in front of the barn.

Follow the red barn around and another (1) SLB bush will be next to the water hand pump.

From the bush by the water pump, turn in a NEE direction and walk towards the far corner of the farm. At the bottom of the hill, before the billboard pole and the bridge, is a soot flower plant, a mutfruit bush, and a (1) SLB bush.

From the bush above, walk straight up the hill, over the bridge, and drop down to the other side. The last (1) SLB bush is between the bridge and the first house on your right.

Turn around and run back to the first SLB bush near the red barn and the grain silo. Stand in the middle of the bush and face South. Start walking forward, past the red tractor on your left, jump the fence, and over the river. Keep heading South until you hit the main road. Check the power pole signs on the left-hand side of the road until you see a green “Morgantown city limits” sign.
Stand with your back to the Morgantown sign and face West. If it is the right time of the day, you can probably see both bushes from that spot, if not then walk forward until you hit a large tree. Walk past that tree until you hit another large tree then turn left and the two (2) SLB bushes will be in front of you.

Go back to the “Morgantown City Limits” sign and face East. Run straight for a while, past a power pylon on your right, and stop at the main road. Turn and follow the road up towards Bolton Green. The first (1) SLB bush is on your right at the bottom of the first power pole.

Keep following the road up and counting power poles on your left. At the bottom of the 4th power pole on your left is another (1) SLB bush.

Keep following the road up and around. Do not enter Bolton Greens. The next (1) SLB bush is on the corner of the intersection, next to a red tractor, at the bottom of the power pole.

Keeping Bolton Greens on your right, follow the road East. Go past two APC’s and a tank. Behind the tank, on the left-hand side of the APC, at the bottom of the power pole, is another (1) SLB bush.

From the APC, follow the road up and stop at the 5th power pole on your left. At the power pole, turn northwest and walk forward a few steps. The (1) SLB bush will be in front of you.

Turn around and run back down the hill/road. Stop at the T junction and the blue truck. There is another (1) SLB bush on the corner, opposite the blue truck, at the bottom of the power pole.

At the above T junction, turn left and walk down the road. Not counting the power pole on the corner, the next (1) SLB bush is at the bottom of the third power pole on your left.

Keep walking down the road, go past a red dump truck, and stop at the end of the mobile home/trailer that is broken down. Turn and face East. There should be a very large tree in front of you, on the other side of the road. The (2) SLB bushes are inside the tree. Yes, they are actually inside the tree.

Go back out onto the main road and keep walking away from Bolton Green. Stop when you get to the front of the Blue ute/pickup truck. Turn left and walk straight until you walk into a large tree. Walk around the tree and keep walking in that same straight direction, until you walk into a very large tree. The (1) SLB bush is only half inside the tree this time.

From the SLB bush/tree above, face East and look up. You will see a large white metal power pylon between the trees. Walk toward the pylon. The next two (2) SLB bushes are between the concrete bases on the right of the pylon.

Turn West and run back to the main road. Once you are back on the main road, there should be a blue sports car parked on the right-hand side of the road with a large tree in front of it. The (1) SLB bush is in front of the large tree.

Keep heading up the road, until you see a row of concrete barriers on your right and a blue ute/pick-up truck on your left.
Go and stand at the back of the ute/pickup truck and face SEE. There should be a tree directly in front of you. Walk straight, around the tree and continue forward. If you keep going straight then you will walk directly into the next two (2) SLB bushes. They are in front of the pine tree (the tree that glowing resin is normally found on).


After harvesting the above two bushes, turn around and head back to the main road. Keep running up the road, past the truck with 4 Pulowski preservation shelters on the back, until you get to a rusty blue sports car that is half across the road. The last (1) SLB is at the bottom of the next power pole on your left.

Riverside Manor to Charleston Train Station (94)

Fast travel to Riverside Manor.
Turn and follow the road West, towards the red dump truck. Keep following the road West, past the dump truck until you get to another red truck and trailer. Stop at the end of the trailer and there should be a short road and a house on your right. Turn and follow the road up to the house. Walk around to the back of the house and face NWW, there should be a (1) SLB bush in front of you.
Line up with the Charleston map marker and walk forward a few meters to find another (1) SLB bush.

Face West and walk forward. There will be two small trees in front of you and to your right and two (2) SLB bushes opposite those trees on your left.

Turn North and run to the end of the house. At the end of the house turn North East and head towards two large trees in front of you. The first (1) SLB bush will be slightly left of the large trees.
Line yourself up so you are between North and the Summersville Dam map marker. Walk forward and you should walk straight into a (1) SLB bush and two mutfruit bushes.
Turn North and walk forward. The next (1) SLB bush is on the edge of the cliff in front of you.
Turn South West and follow the cliff edge along until you hit a dirt/cliff face. Jetpack, jump or round around so you are standing on top of the cliff face and you will see two (2) SLB bushes at the top.

Line yourself up with the Hornwright Air Purifier Site #01 map marker and walk forward. You will pass a large tree on your left and a tree stump on your right. Continue straight and you will walk into your next (1) SLB bush.

Turn South, run up the hill and stand in the middle on the main road. Face East and run back up the road until you are standing at the front of the red truck and trailer.
Turn until you are facing the Hornwright Air Purifier Site #01 map marker and walk forward. The first (1) SLB bush will be on your left. Keep walking forward and the next (1) SLB bush will be in front of you, at the base of a large tree.

Turn North and run back out onto the main road. There should be a mutfruit bush and a house in front of you. Head towards the left hand corner of the house and you will see the next (1) SLB bush on the corner, at the base of a small tree.
From there, turn around and face the main road. Walk forward and you will see another (1) SLB bush on the edge of the road.

Keep heading West down the main road. Just before the next set of houses, is one (2) SLB bush on either side of the road, opposite each other.

Head West up the main road until you get the last house on your right. Turn down the drive way and stand on top of the red tractor. Make a choo choo noise and then turn and line yourself up between the North and Charleston City Hall map marker on your pip boy. Walk forward, there will be two (2) SLB bushes on your left and a third (1) SLB bush on the edge of the cliff.
Follow the cliff top around, through a clearing and there will be another (1) SLB bush on the edge of the clearing and the cliff top.

Turn West and run straight until you hit a dirt/cliff face. Jetpack, jump or run around to the top for another (1) SLB bush.

Run straight and stand in front of the red double doors of the fire station as pictured above. Turn so the fire station is on your right and walk up the road. At the T junction, turn left. Stick to the guard rail on the left hand side of the road and you will see the (1) SLB bush on your left.
Turn around and face South. There should be a rocky hill in front of you. Jetpack, jump or run around so you are standing at the very top of the hill. You will see the (1) SLB bush at the top of the hill next to two mutfruit bushes.

Run over to the Rusty Pick and stand in the car park. Walk over to the green dumpster that is in the car park next to the separate brick building and get inside it cause that is where you belong...jokes. Stand so the green dumpster is on your left hand side and walk forward. Jump down the small cliff face and you will see the two (2) SLB bushes next to a mutfruit plant in the clearing.

Face East, walk forward a few steps and stop when you are at the top of the cliff edge. Turn left and follow the cliff face all the way around. The next (1) SLB bush will be on your left near some rocks and some mutfruit plants.

Head East until you get to a cliff. Drop down the cliff and turn North. Walk forward until you see a steel ore deposit vein. Stand inside the deposit and look towards the Fire Station. The (1) SLB bush will be in front of you and to your left.
Stand inside the SLB bush and face East. Walk forward, past the concrete wall and you will see the next (1) SLB bush next to a mutfruit plant.

Run over to the Fire Station. Move so you are on the main road that is heading towards Charleston. Follow the road down until you see a bridge with Super Mutants on it. At the start of the bridge, turn East and drop down onto the ground. There will be a (1) SLB bush in front of you.
Turn South and you will see a large tree in front of you. Walk up the hill and stand at the front of the tree. Turn East and walk forward a few steps and the next (1) SLB bush is on your right.

From there, turn around to face the bridge and head towards the building on the other side of the bridge. You will see a black roof, walk across the black roof while looking South and you will see the (1) SLB bush next to a mutfruit plant.
Jump back up onto the black roof and face North. You will see the next (1) SLB bush on the other side of the road.

Fast travel or run over to AVR Medical Centre.

If you run over, head towards the car park and the concrete wall. The SLB bush is on top of the concrete wall facing South.
OR
From the fast travel point, walk forward a few steps, and the first (1) SLB bush should be in front of you.

From the bush below, turn and face North. Run straight until you get to the footpath/sidewalk on the left hand side. Follow the footpath along, past the limo. When the footpath/sidewalk curves, keep going straight and you will walk into the next (1) SLB bush.

From this bush, turn left and run towards the Charleston Trainyard Icon. Alternatively, you can fast travel to the trainyard.

From the Charleston Trainyard fast travel point, turn and face North. Run forward and drop down to the ground. In front of you and to your left should be three (3) SLB bushes.

Keep running forward and follow the train track until you get to a train carriage. There should be another three (3) SLB bushes on your left, next to the metal pole.

Stay on the train line, walk around the carriage or jump up and run along the top of it.
Keep running along the train line, past a row of carriages off the track, up the hill, until you see 2 large trees on your left. There should be three (3) SLB bushes against the second large tree.

Continue to follow the train track, until you reach the bridge. Cross the bridge then move to your right, to the edge of the concrete wall. Drop down to the ground so the concrete wall is now on your left hand side. Keep walking forward and you will trip over the next three (3) SLB bushes.

Turn right and walk straight until you reach a road. Turn left and follow the road down. Just past the bus, there is a dirt road in front of you, while the main road curves to your right. Follow the dirt path straight until you get to the first large tree on your right, walk over to the tree and there should be another three (3) SLB bushes there.

Turn and face North. Run straight, across the road (look both ways first), off the edge and across to the other side of the river bed.
Once you are on the edge of the other side of the river bed, turn left until the Poseidon Energy Plant WV-06 icon map marker is in the middle of your compass HUD.
Start walking straight, once you pass the iron deposit on your right, you should be at the base of a small rock hill. Keep the icon map marker in the middle of your compass, jump up the hill and then slowly continue to walk straight, through some bushes until you trip over the next three (3) SLB bushes.

Turn and face West. Run straight forward until you reach the concrete footpath/sidewalk that is on the edge of the Kanawha Nuka-Cola Plant car park. Turn left and follow the path forward a few steps until you see a large tree, closest to the footpath, on your left. Turn and walk up to the tree. Walk around the tree so the trunk is at your back and you are facing East.
Walk forward slowly and the first (3) SLB bushes should be on your right. The next (1) SLB bush is at the base of the tree directly behind the other three.

Fast travel to Camp Adams.

From the fast travel point, you want to run up the hill to the main camp and stand in the fire pit near Scout Leader Penny.
Face South and run up to the two cabins in front of you. Stand at the Tadpole Vending Machine and turn West. Walk forward and stop at the end of the cabin on your left.
Line yourself up so you are between the Kanawha Nuka-Cola Plant and Lewis & Sons Farming Supply map marker. You should see a cabin and a tower in front of you.
Walk forward and stand on the corner of the tower, at the base and turn until you are facing between the Kanawha Nuka-Cola Plant map marker and the Lewis & Sons Farming Supply map marker. Walk forward and jump down 3 cliff faces. The three (3) SLB bushes will be at the bottom of the third cliff.

Face West and run down the hill towards Lewis & Sons Farming Supply. Once you get there, grab the salt and pepper off the picnic table near the brahmin shed and then turn North. In the distance, you will see a Mr Handy tending to a small farm and behind that, you will see a broken house with a robot moving around inside. Head towards the broken house. Stand at the back door of the broken house and look North West, the (1) SLB bush is in front of you, at the base of a tree.

From that bush, turn West and run forward until you are standing on the main road. Follow the road North until you see a stone wall on your left, with a small green sign that says "Please stay on paths".
There will be a lot of Cultist's here so perhaps run ahead and clear the area first and then come back to the stone wall and the small green sign.
Turn left and follow the dirt road up towards the church. While walking up the dirt road, on the left hand side, you will see a car park with 4 cars in it. Head towards the car parked closest to the church, stand on the front of that car and face South . The first (1) SLB bush will be in front of you, at the base of the tree.
From there, turn and walk towards the Church. There should be a large tree between yourself and the Church. Stop at the base of the large tree and the next (1) SLB bush is on your right, next to the base of the tree.
From that bush, turn North and cross over to the other side of the dirt road/path, there will be another (1) SLB bush in front of you and slightly to your left.
Stand inside the bush above and turn North West. Walk forward, there will be a small tree on your slight left with another (1) SLB bush at the base.

The next three are going to be hard to describe so you might need to refer to the photos.
From there, head back to the Church. On the right hand side of the Church is a stone wall. Follow the stone wall down the side and stop when you get to the end of the wall. Turn until you are lined up with the Camp Adams lookout tower map marker. Walk forward, past a mutfruit bush and you will see the (1) SLB bush at the base of a small tree.

Stand inside the SLB bush and turn until you are facing between Billings Homestead and Camp Adams map marker.
Walk forward and past a small tree on your right, a large tree on your left, a small tree on your left and a large tree on your right.
The next tree should have the (1) SLB bush growing at the base of it.

From that bush, turn and face the Kanawha county cemetery map marker. Walk forward, keeping in line with the map marker. As you get closer, head towards the gap in the stone wall. The next (1) SLB bush will be in the trees just before the gap in the wall.

From there, run back over to the church and stand in the doorway. Turn so you are facing the car park. Follow the dirt road back down until you are standing on the main road. Follow the road North and look at the base of the power poles on your left. The next (1) SLB bush is on the left, at the base of a power pole next to a rotting tree trunk.

Stay on the road and keep heading North past the cemetery. Once you get to the end of the cemetery, there will be a power pole on the corner on the right. There is one (1) SLB bush at the base of the power pole. The next power pole on your right has the last (1) SLB bush growing at the base.

Fast travel to Charleston Train Station.

From the fast travel point, turn and face North West. Jump, Jet pack, or run around, but you need to get to the very top of that hill. At the top of the hill, you will find a copper vein deposit. Stand in the middle of the copper deposit and face South. Walk straight forward until you hit a large tree. In front of that tree are two (2) SLB bushes.

From the two bushes above, continue straight South until you get to a cliff. Jump off the cliff and in front of you should be a large tree with two (2) more SLB bushes at the base.

From those bushes, turn West and head towards the Giant Tea Pot. Stop when you get to the edge of the cliff, just before you jump down onto the road. The (1) SLB bush should be on the cliff, in front of you.

From the cliff, turn East and start running. Jump down a cliff and across the train tracks, stopping when you get to the brown boat lying in the river. Jump onto the boat and stand on the end of the boat, closest to the red bridge. At the end of the boat, face North East and look straight, you will see some green pine trees ahead of you. Head towards the pine tree and the (1) SLB bush is at the base of the third tree, near a guy with a typewriter and a sleeping bag.

Face North and jetpack up or run around until you are standing on the red metal bridge.
Head East until you get to the end of the bridge and then turn right. You should be facing a cliff top. Lining yourself up so you are between the Wade Airport and the Charleston Herald map markers. Directly in front of you will be a (1) SLB bush.
Stand inside that bush and face South. Follow the cliff top along and you will see the next (1) SLB bush a few meters away.

Turn around and head back North. Cross the train tracks and drop down two small cliff faces. The (1) SLB bush will be on your right next to some firecracker berries.

Stand inside the bush and face West. There will be a large tree in front of you. The next (1) SLB bush is on the other side of that tree, at the base.

From the base of the tree, turn West and head towards the large white metal power pylon. Walk under the pylon and keep going forward until you hit a rock wall. Turn right and follow the rock face down. Just past the soot flowers is a (1) SLB bush.

Turn East and run towards the white broken-in-half boat. At the end of the boat turn North and you will see two (2) SLB bushes in front of you.
Turn and face the Wade Airport map marker. Walk past some Rhododendron flowers and a broken car. At the top of the small hill is another (1) SLB bush.

Face West, run past the white broken in half boat, and stop in the middle of the river bed. Turn right and follow the river bed down North. You will see a (1) SLB bush next to a mutfruit bush, on top of a small island.
Turn North West and walk forward until you get to the next (1) SLB bush on the edge of the river bank.
Face North and turn slightly to your left, there should be a large tree in front of you and a (1) SLB bush in front of the large tree.

Stand inside the last SLB bush and face East. Walk forward until the first set of black and brown shrubs and bushes. A (1) SLB bush is hidden inside the shrubs.
Turn and face North East. Walk forward, past some soot and rhododendron flowers, and up a small hill to the next (1) SLB bush, next to two mutfruit plants.

Turn and face the large white metal power pylon. Walk straight towards it and then head towards the furthest concrete block on your right. The (1) SLB bush is next to that concrete block.

Turn East and run up the hill. Adjust your course so you are running towards the overturned train carriages. In between the overturned blue carriage and the red carriage that is still on the tracks, is a large sealed metal container. Behind the metal container is a (1) SLB bush.

Turn around and head back to the SLB bush that is next to the large metal power pylon.
Turn and face North East. Walk forward until you see some rhododendron flowers on your left and a copper vein deposit on your right. The first (1) SLB bush is on the edge of the copper vein deposit.
Look NEE to see another (1) SLB bush, near some aster, firecracker berries, and mutfruit plants.
Face West and run forward. Near some rhododendron flowers is another (1) SLB bush.

The Deep (19)
It is recommended to enter via The Deep map marker in the Savage Divide. You will need to equip Aqua girl/boy.

Once you clear the water, you will enter a room with a small version of the Interloper lying in the middle. In that room, there are six (6) SLB bushes.


From that room, continue to follow the tunnel until you get to the main building. There are (13) SLB bushes in total here. Start at the front and walk around the building, starting on your left. Make sure to look up and grab the SLB bushes that are on top of the rock piles.
Front (6) SLB bushes

Left hand side (2) SLB bushes

Back of building (3) SLB bushes

Right hand side (2) SLB bushes

Morgantown Trainyard to Slocum Joe’s (77)
This particular route was hard to document using pen, paper, and photo methods, so you might need to refer to the photos for locations.
Do not panic if it looks like you are going past a SLB bush and I haven't documented it. I have, just on a different route. If, however, I have managed to miss one in this area, please send me a message and let me know.
Note: Keep an eye out for firecaps during this route. They will generally spawn right next to a starlight berry bush.
Fast travel to Morgantown Trainyard.

Turn and face West and forward until you are standing inside the trainyard. Look in a South Westly direction until you find a train track. Stand on the train track and follow it South. Keep following the train track along until you get to a red bridge. Stop at the end of the red bridge and look to your right. There will be two (2) SLB bushes on top of the hill at the end of the bridge.

Go back to the train tracks and keep heading West until you get to the second red bridge. At the start of the second bridge, drop down into the river, on the left hand side of the bridge.
Line yourself up with the Gauley Mine Exit map marker and walk forward until you hit a very small tree. Walk past the small tree and stop at the second small tree behind it. Turn and face South and you will see two (2) SLB bushes in front of you.

Stand inside the SLB bush that is closest to the small tree and look towards the Gauley Mine Exit map marker. You will see a very large tree and to the left of the tree is another (1) SLB bush.

Stand in the SLB bush and face North, back towards the bridge. You will see two (2) SLB bushes on either side of the large tree, near the bridge.

From those two SLB bushes, head back to the red bridge and the train tracks and face West. Keep walking down the the train tracks until you see a broken ramp on your left. Walk past the broken ramp and you will see a small rock/cliff and then a gap and then another rock/cliff on your left. Turn and face the gap in the rocks. The first (1) SLB bush is near the rock/cliff on your left and the other (1) SLB bush is further up the back near a large tree.

From the SLB bush at the top of the hill, turn West and walk forward until you hit a tree. Turn North and a (1) SLB bush will be on your left.
Walk over to the train tracks and face North. There will be a large tree on your left and a (1) SLB bush on your right, next to a Iron vein deposit.
Go back to the train tracks and stop at the Responder Courier. Face West and you will see a (1) SLB bush in front of you/to your left.
Stand inside the SLB bush and turn to face the Gauley Mine map marker. You will see (2) SLB bushes on the other side of the tracks in front of you.

Stand in the middle of the two SLB bushes and face Slocum Joe's map marker. You will see another (1) SLB bush in front of you, up the hill.

Stand inside the SLB bush and line yourself up between the Slocum Joe's and West map marker but closer to Slocum Joe's. Walk forward and you will walk straight into the next (1) SLB bush.
Turn South and walk forward until you get to a rock/cliff. The next (1) SLB bush is inside the rock/cliff, on the second ledge.

There should be a large tree on your right. Go over to the tree and stand in front of it so you are facing the red truck and trailer out on the main road. Walk forward, stand on the train tracks and line yourself up with the middle of the red truck and trailer. You will see a (1) SLB bush on your left and another (1) SLB bush on your right.

Turn around and go back to the train tracks.
Keep heading South along the tracks, past the train carriage, and stop at the fork in the train tracks. The entrance to Gauley Mine should be on your left. If you stand at the fork and face South, the (1) SLB bush is directly ahead of you, on the other side of the car park, near a large tree.

From that bush, turn and face West. Walk forward over the train tracks and there will be a large tree in front of you. The next two (2) SLB bushes are on the left side of the large tree.

From those bushes, go back to the train track and follow it South. On the left hand side, in line with the Slocum Joe's building, is another (1) SLB bush.

Face West and run down the hill until you are standing on the cliff top that is behind Slocum Joe's. Turn South and the (1) SLB bush will be in front of you.

Jump down the cliff and stand at the back door of Slocum Joe's. Look for the green dumpster and stand on top of it. Face East and the (1) SLB bush is in front of you against the rock wall.

Walk back to the building and keep following it around. The next (1) SLB is at the base of the power pole, on the edge of the carpark.

From that bush, turn West and walk forward so you are standing on the main road. Turn South and walk on the white line that is on the left hand edge of the road. You will see the (1) SLB bush behind the guard rail.
Look East and there will be a large rock a little up the hill. Walk forward and stand on top of that rock. Turn South East and there will be two (2) SLB bushes in front of you.

Turn East and walk back up the hill to the train track. Walk South along the train track until you get to a large tree whose branches are hanging over the line. Stand with your back to the tree and face East and you will see the next (1) SLB bush in front of you, on top of a small rock/cliff face.

Fast travel back to Morgantown Trainyard.
Turn and face West and forward until you are standing inside the trainyard. Look in a South Westly direction until you find a train track. Stand on the train track and follow it South. Keep following the train track along until you get to a red bridge. Stop in the middle of the red bridge and turn West. Jump off the bridge so you are standing in the middle of the main road. Move so you are standing on the white line on the edge of the left hand side of the main road.
Walk forward until you see two cars on the side of the road. The (1) SLB bush is on the side of the road, behind the blue ute/pick up truck.

from there, line up with the Gauley Mine Exit map marker, walk forward and slightly up the hill. you should see the (1) SLB bush on your right and a large tree on your left.

From the large tree mentioned and marked in the photo above, stand with your back to the tree and face West. Walk straight forward towards the river and you will walk into the next (1) SLB bush.

Stand inside the SLB bush and turn so you are facing the end of the red bridge. The (1) SLB bush is in front of you, on the wrong side of the river, with Benny and the horses.

From that bush, line yourself up between the West and Gorge Junkyard workshop map markers and walk forward. You should walk straight into the next (1) SLB bush.

Stand inside the bush and face North. The next (1) SLB bush is directly in front of you, between you and the main road.

Stand on the main road and turn East. Walk forward and stand on the back of the truck with the hay on it. Move forward until you are standing on the cab of the truck and then turn North. There will be a fence in front of you. There is a large tree behind the fence and then a smaller tree to the right of it. The (1) SLB bush is between the large tree and the smaller tree.

Line yourself up between the North and Gorge Junkyard map markers. In front of you is a large tree and behind that is a second large tree. Run to the second large tree. With your back to the tree, turn and line up with the Gauley Mine map marker. Walk forward to the edge of the river and you will see the (1) SLB bush in front of you.

Face South and run forward until you get to the main road. Turn and face West. Follow the white line that is on the edge of the right hand side of the road.
The first (1) SLB bush is at the base of the power pole, just before the guard rail starts.
Heading in the same direction, the next (1) SLB bush is a few meters way from both the main road and the previous bush.
Face North at the next power pole and you will see the other (1) SLB bush in front of you.

Go back to the first SLB that is by the power pole and the guard rail. Turn and face South. On the other side of road, directly opposite you, are two (2) SLB bushes.

From those bushes, turn and face West and you will see another (1) SLB bush in front of you.

Face West and run straight until you get to the edge of the river. Still facing West, follow the river along for a few steps until you see a flat rock in front of you. Stand on top of the rock and turn South. The (1) SLB bush will be in front of you.

Turn and face West. Stay in this direction and walk towards the main road. Just before the main road, there will be a huge tree on your right and a (1) SLB bush on your left.

Stand inside the last SLB bush and look West. There should be a road, a concrete barrier and a power pole in front of you. Walk forward, jump over the barrier and stand in front of the power pole. To the left and just behind the power pole is another (1) SLB bush.

Behind the SLB bush is a copper deposit vein. Stand inside the deposit and turn until you are facing the Slocum Joe's map marker. Walk forward until you get to a clearing and you will see the (1) SLB bush. Refer to the photo below.

Face South and run forward towards the red truck and trailer in front of you. Jump up, stand on the cab of the truck and face West. There will be two trees in front of you, a large tree on the right and a smaller tree on the left. Walk over and stand with your back to the little tree and turn towards the SLB bushes as per the photo.
The three (3) SLB bushes are pretty much in a straight line from each other.

From the middle SLB bush, face West and stand on the road. In front of you, on the other side of the river, is a large tree on your left. The (1) SLB bush is on the right hand side of that tree. Refer to photo as needed.

Turn and face South. Walk forward until you get to the edge of the river. You should be standing inside another (1) SLB bush.

Stand inside the bush and line up with Gauley Mine. Walk forward and cross the river. On the edge of the river in front of you will be another (1) SLB bush.

Head back towards the main road. Follow the road South, past Slocum Joe's, until you get to a yellow bus on the right hand side of the road.
Stand in front of the bus and face West. There should be a large tree in front of you. Walk over to the tree and the (1) SLB bush is on the left hand side of the tree.

Turn East and run forward, over the first road and stop in the middle of the second/main road. Turn South and run forward, on the right hand side of the road, until you get to a truck with car frames on the trailer. Next to the trailer is a power pole. At the base of the power pole is another (1) SLB bush.

Jump up and stand on the edge of the car frame, on the trailer of the truck and face West. The (1) SLB bush will be in front of you.

Face South East and run forward until you are standing on the main road. Follow the road up towards Sutton until you get to the house on the corner (left hand side of the road).
The house on the corner has four (4) SLB bushes.
One at the front by the Sutton sign.
One behind the dog house.
One next to the green and white chair that is behind the house.
Stand on the stairs of the house and face South East, the next bush will be in front of you, on the edge of the yard and the forest.

From the house, go back up to the train track and continue to follow it until you see a cream/light yellow container on one side of the train track. There is a (1) SLB bush down the hill from the container.

From the last bush, turn North and run back up the hill until you are standing on the train track, next to the yellow shipping container. Follow the train tracks back towards Slocum Joe’s. On your right, next to the yellow shipping container is a large tree, next to that are some brown scrubs and bushes. The next (1) SLB bush is in the gap, where the scrubs stop and the rocks start.

Stand inside the SLB bush above and look up the hill towards Arktos Pharma. There will be another two (2) SLB in a North East - ish direction up the hill.

From the two SLB bushes above, look up the hill until you see a green pine tree. Walk towards the green pine tree, the next (1) SLB is between the last two bushes and the green pine tree.

From the last bush, walk over to the green pine tree then turn and face South. Start to walk slowly down the hill and you will see the next (1) SLB bush in front of you.
Turn so you are facing between the Helvetia map marker and East. Walk forward in that direction and you will see the next (1) SLB bush, half hidden in the ground.

Face North and run up the hill, towards the three tall trees. The next (1) SLB bush is hanging off the last tree, closest to the edge.

From the three trees above, turn and face East. Walk forward, jump over some rocks and keep going forward until you get to a clear area with rocks on either side of you. Arktos Pharma should be in the distance on the left hand side. The (1) SLB bush is on the edge of the rock and the clear area, on your right hand side.

From the bush above, turn and face South East. There should be one small-ish tree in that direction. Walk down the hill towards the tree. Just past the tree is another (1) SLB bush.

From there, face North and run straight up the hill until you get to the flat part at the top of the hill. (Should be on your left with three trees and a copper vein deposit). There are two (2) SLB bushes close to the copper vein deposit.

The next one might be a little tricky to find. From the top of the hill, turn North and run straight. You will notice that there are no trees and then there are trees and then no trees again. The (1) SLB bush is in that gap of land, just after the first set of trees. Alternatively, if you know where the acid node is at the top of the hill, then face West and slowly walk down the hill. The SLB bush will be in front of you and to your left.

Hopefully you found the SLB bush above. From that bush, turn and face South West and walk forward, down the hill, until you get to the first cliff. In front of you should be a really big tree. Jump down the cliff and stand at the bottom of the tree. At the tree, turn North and the two (2) SLB bushes will be in front of you.

From the top SLB bush, turn and head towards Gauley Mine. Keep walking forward, until you get to a cliff face. Turn South and the last (1) SLB bush should be in front of you.

Where to find and how to farm for Starlight Berries - Route 1
Where to find and how to farm for Starlight Berries - Route 2
Where to find and how to farm for Starlight Berries - Route 3
Where to find and how to farm for Starlight Berries - Route 4
Where to find and how to farm for Starlight Berries - Route 5
Where to find and how to farm for Starlight Berries - Route 6
Love food buffs?
Join us at Buffs n Brew, a group dedicated to food buffs and food buff farming.
Discord - All Platforms
Facebook - PC
Facebook - XBOX
Facebook - PlayStation (Opening July 2024)

Hi, I'm Kat or Duchess
I'm an Australian data miner who writes farming, event, and food buff guides for Fallout 76.
I believe that all knowledge and information should be free, which is why my guides will never be locked behind a paywall. However, running a website and photo and video editing software does not come cheaply.
So, If you found my guides helpful, please consider buying me a ko-fi (coffee) using the link below.
All monies go towards the tools for writing my guides and maybe for an actual cup of coffee or 3 ;)
Alternatively, share my guides with your fellow vault dwellers and help them to survive the wasteland.


Comments