
The Pitt - From Ashes to Fire (Mission 2) Guide
- Duchess Flame
- Sep 3, 2022
- 17 min read

Updated: Jun 22, 2023

With credit to Vicyorus and thanks to Garust.
This guide will have spoilers. I have done my best to limit them but they are still there.
The following information will prepare you for The Pitt Expeditions - From Ashes to Fire (mission 2).
You will need a full ultracell battery to start an Expedition. As of June 2023 you do not need an ultracell battery to start Expos.

A full guide to the Refuge Dailys and Expo rewards can be found here.
A full guide to Union Dues - Mission 1 can be found here.
Map of The Pitt - From Ashes to Fire can be found here.
Amazing community made map can be found here.
Credit to Reddit user: Charming_Wolf4148
Expeditions
Expos are set up similarly to how daily ops are set up now. For example, in Daily ops, you might have decryption, freezing robots in the burning mine. In expos, it might be gather and deposit, carry and throw and solve locks or proximity tracker, assassination and solve locks. On top of that, each one of those objectives could spawn in 3 of 5 possible locations.
Because of this random structure to expos, it can be hard to write a detailed guide. Instead, I'm just going to explain what each objective is, what to look for and how to complete it. This way, it doesn't matter where you get thrown into, once you have your bearings, you should be able to just get straight into it.
The missions are not timed per se. There is no clock counting up or down in the corner. However, for some objectives, you will need to get to an NPC or a location before the bar in the top corner goes empty.
Each mission has 3 parts to it, plus three additional objectives. The tasks for part 1, 2 and 3 will change but the additional objectives do not.
Part 1 will be either Gather and Deposit, Object Destruction or Proximity Tracker.
Part 2 will be either Free Prisoners, Carry and Throw or Assassination
Part 3 will be either Solve Locks, Repel Enemies or Defend NPC.
Additional objectives for From Ashes to Fire will always be Prisoner Collars, Fanatic Skeptic and rescue the Survivors.
Keep in mind, that you get better rewards if you do all the additional objectives and for the most part, you walk past them anyway when you are doing the main mission.
How the checkpoints in expeditions work.
There are certain points during expeditions, where if you leave the expo or the world, it will save your progress and allow you to continue the expo on another day or at another time.
This is only if you are the team leader, the game will not save your progress if you are just a team mate.
You must complete a checkpoint for the game to save your progress.
Checkpoint #1
Load into an expo
Checkpoint # 2
Speak to Hex or Danilo
Checkpoint # 3
Complete the first task (part 1). If you do not complete all the objectives for part 1 and you leave the expo then, when you return, it will roll you back to the start of checkpoint #3 and you will have to complete the objectives again.
Checkpoint # 4
Go to the Penn or the Outpost
Checkpoint # 5
Speak to Hex or Danilo
Checkpoint # 6
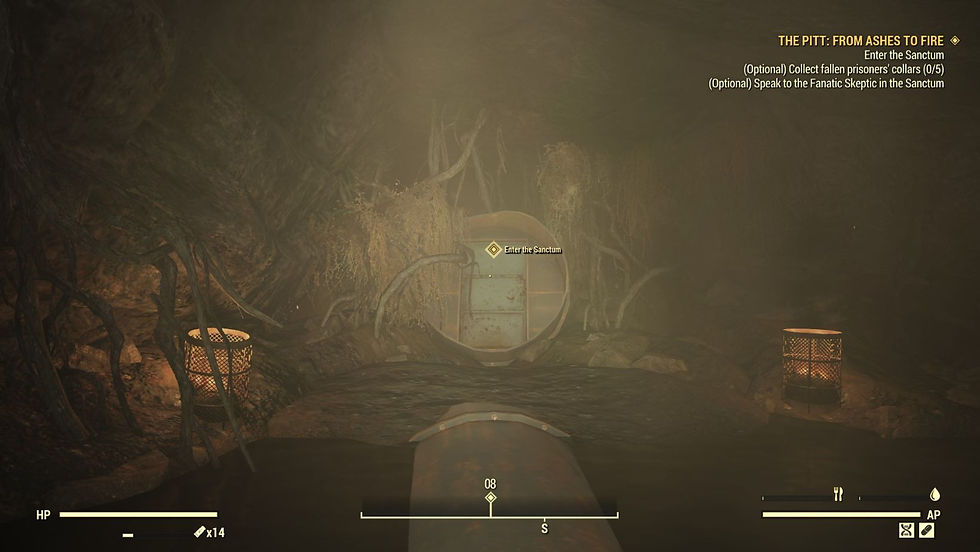
Enter the Foundry or the Sanctum
Checkpoint # 7
Complete the second task (part 2). If you do not complete all the objectives for part 2 and you leave the expo then, when you return, it will roll you back to the start of checkpoint #7 and you will have to complete the objectives again.
Checkpoint # 8
Complete the third task (part 3). If you do not complete all the objectives for part 3 and you leave the expo then, when you return, it will roll you back to the start of checkpoint #8 and you will have to complete the objectives again.
Checkpoint # 9
Go to the Penn or load through the doorway into the Trenches.
Checkpoint # 10
Protect or rescue the NPCs.
If you leave the expo mid protecting/rescuing the NPCs and the NPC's are still all alive, then it will roll you back to checkpoint #9.
However, in Union Dues (mission 1), if one of the NPC's dies and you leave the expo, then it will checkpoint and class it as a fail. If you fail the protect the NPCs and leave then come back, the objective will change to defend the Penn.
In From Ashes to Fire (mission 2), if one of the NPC's dies and you leave the expo, then it will checkpoint and class it as a fail. If you fail to rescue the NPCs and leave then come back, the objective will change to speak to Danilo.
Checkpoint # 11
Speak to Hex or Danilo
Checkpoint #12
Speak to Lennox
Steel Ingots
If you pick up one steel ingot and then leave the expo, then no matter how many times you leave and come back, its going to be 1/5 BUT the locations for the other 4 will change. If you pick up 2 steel ingots and then leave the expo, then it will be 2/5 when you return etc etc.
Union Supply Crates
This will stay as "Retrieve the Union supplies" on your task list, until you find and open the supply crate. Once you have opened the crate then it will show as "Return the supplies to Wicker", until you return the supplies to Wicker. If you do not collect the suppy crate and leave the expo, then the location may change.
From Ashes to Fire (Mission 2)

You will need:
Rad protection
I'm not talking pop a rad-x diluted. I'm talking Power Armour, hazmat suit or Chinese Stealth Suit rad protection. While some areas you could get away with a rad-x diluted or radshield, others will have you dead from rads in 30 seconds.
If you forget to bring your gear, then hazmat suits, radaway and rad-x can be found in marked areas around the map.
Poison Resistance
This might be more a Quality of Life vs a necessity, however rank 1 legendary perk card Funky Duds at a minimum can make the Trog's attacks a little more pleasant to deal with. Rank 2 will void most, if not all of the Trog's poison.
Lock Picking and Hacking cards
There are multiple objectives that will require you to pick a lock. You can equip the legendary perk card Master Infiltrator, Picklock perk cards under Perception and Hacker perk cards under Intelligence. A bobby pin or two also wouldn't go amiss here.
Friendly Fire perk card
The last task of the mission requires you to rescue three survivors from the Trench. If the survivors die then you can only ever achieve tier 2 rewards. We highly recommend as many team mates as possible, to equip this card and use it on the survivors.
A full list of weapons and mods that work with Friendly Fire can be found here.
AP and AP Regen buffs
This map is very large and there is a lot of running involved.
Look at boosting your Agility, AP, AP refill and AP Regen with perk cards and mutations like Action Boy/Girl, Marathoner, Full Charge, Power User and Speed Demon.
And
Food and Drinks buffs such as Company Tea, Lemonade, Steeped Fever Blossom Tea, Canned Coffee, Sunshine Oil, Infused Soot Flower Tea, Royal Jelly Taffy and Steeped Melon Blossom Chai.
AP refill food buff list.
AP regen and Max AP food buff list.
Damage Output
While the Trogs aren't too bad, the Fanatics can be pretty tanky, more so the bosses. Pack for combat over quality of life perks and bring lots of ammo.
Environmental Hazards:
Bear Traps
Trip Wires
Turrets that slap hard
Low visibility
God damn mole rats
Part 1
You will be tasked with either:
Gather and Deposit: Danilo wants me to raid the nearby Fanatic labor yard for supplies: specifically, for masks and meds designed to combat the unique dangers of the Trench. Once I've gathered them, I need to deposit the supplies in hidden dropboxes.
OR
Object Destruction: Danilo wants me to delve into the chasm and destroy any hazardous blockages that have formed as a result of runoff waste. This will keep the Trench traversable for survivors and escapees.
OR
Proximity Tracker: Danilo wants me to suit up with radiation gear and locate the Trench's worst hazard zones. Once found, I'm to stake the hazards and pump them full of a neutralising formula.
Part 1 explained:
Where Danilo spawns, will tell you in advance which one of the below tasks you will be given.
Gather and Deposit
Once you have loaded in, follow the map marker and speak with Danilo.

He will ask you to collect 8 Trench Meds and 5 Trench Masks and then deposit them into a drop box.
Apart from the area search map marker to direct you to The Trench. There are no other map markers for this objective.
The Trench Masks drop from the Fanatic Scouts.
The easiest way to complete this objective is to kill everything and then use area looting to collect all the masks in one go.

The Trench Meds can be found in the yellow loot boxes in the area.
Most of them can be found in the building in the middle with a few around the edges of the crater.


Once you have collected the meds and masks, you will see a direct map marker on your HUD, pointing you towards the drop box location.


Once you have deposited the meds and masks, you will need to go back and speak to Danilo at the outpost.
Object Destruction
Once you have loaded in, follow the map marker and speak with Danilo.

Danilo will ask you to destroy 8 hazardous blockages (Chemical Waste) in Jaxon's Noose.
You will be given an area search marker on your HUD for you to follow.

The blockages can spawn in different locations each time and there are no direct map markers for this part.
Instead look for pipes that are leaking a green/yellow shiny glowing goo. These goo blobs can also be found inside train carriages, half underwater and leaking from rock faces.

To destroy the "Chemical Waste", just shoot at it.

When you get down to the last three left to find, you will get direct map markers pop up on your HUD.

Once you have destroyed all the waste, you will need to go back and speak to Danilo at the outpost.
Proximity Tracker
Once you have loaded in, follow the map marker and speak with Danilo.

Danilo will ask you to neutralise 3 hazards in The Trench.
You will be given an area search marker on your HUD.
The Hazard Strength bar works like the hot and cold game. The closer you are to the hazard, the fuller the bar will be. The further away from the hazard you are, the emptier the bar will be.

You are looking for 1 to 7 blue plastic barrels, on top of a pile of green goo, smoke, dirt and rads.

To "neutralise" the hazard. Walk up to one of the blue barrels and interact with it.

Collapsed Train Tunnel
There are multiple possible hazard locations in this area. For example:
One under the broken road on the left hand side of the train carriage

Chemical Dump
There are multiple possible hazard locations in this area. For Example:
One behind the waterfall, on the far right top corner of the area with the metal silo.

Jaxon's Noose
There are multiple possible hazard locations in this area. For Example:
On the ledge, above the ripped open train carriage.

Once you have neutralised the hazards, you will need to go back and speak to Danilo at the outpost.
Part 2
You will be tasked with either:
Free Prisoners: Civilians are being held captive in the catacombs, where they are tormented by trogs. I need to get the key from the Fanatic Warden and free the captives.
OR
Carry and Throw: The trogs roaming the underground make it near impossible for anyone to escape the Sanctum. I need to pick up stashed Troglocide and throw it into trog nests to thin the beasts' numbers.
OR
Assassination: I need to take out several Fanatic Harrowers, who are in charge of delivering pain and torment to their prisoners.
Part 2 always starts the same way, meet Danilo at the outpost and then speak to Ava Rose.
The Team Leader needs to speak to Ava Rose, before you leave to start part 2 of the mission.
Ava will give you the additional objectives that need to be completed.
While both the team leader and team meates can collect the collars and save the survivors, only the team leader can start and turn in the additonal objectives. The collars are automatically added to the team leaders inventory, regardless of who picked them up.
Ava and Danilo are both good sources of lore and are worth having a chat with when you have the time.
Doggo is friendo. A note can be found on Jaxon’s body (found in the Jaxon’s noose area) that covers a little of Morley’s back story.

Part 2 explained:
Free Prisoners
Find Danilo at the Outpost (follow the map marker).

Danilo will send you to the sewers to find the Fanatic Warden. This location will change each time. Just follow the area search map marker until it turns into a direct map marker.

You will need to kill the Fanatic Warden and loot the keys off his body.
Team leaders or team mates can loot the keys from the body.

Once you have collected the keys, free the laborers from their cells.
There are three cells to find in total and all have direct map markers leading to them.

To unlock the cell, just interact with the cell door.
It doesn't matter which team mate looted the key, as anyone on the team can unlock the door.

Once you have unlocked all three cells, Danilo will ask you to head over to the cathedral for part 3 of the mission.

Carry and Throw
Find Danilo at the Outpost (follow the map marker).
After speaking to Danilo and Ava, you will need to follow the map marker and head into the Sanctum.
Once inside, follow the area search marker to the Catacombs.

Keep an eye out for turrets and traps in this area. The Trogs aren't particularly pleasant in here either.
At this point Danilo will ask you to throw Troglocide into 3 Trog Nests.
Both the Troglocide and the Nests can all spawn at different locations each time however you will be given a map marker to find them easier.
Troglocide
This will take over the grenade slot as soon as you pick it up.

Trog Nest
Throw the Troglocide like a grenade at the nest.
You do have to be very close to the nest when you throw the Troglocide for it to register.

Repeat this until all three nests are destroyed.
Switch over to third person and check out your character after you have picked up the first Troglocide grenade to see something cool.
Danilo will ask you to head over to the cathedral for part 3 of the mission.

Assassination
Find Danilo at the Outpost (follow the map marker).
Danilo will ask you to enter the sanctum and then the sewers in order to elimate three Fanatic Harrowers who have been torturing the labourers.
You will only be given area search markers on your HUD to locate the Harrowers.
Note that their postions may change each time however they can generally be found in the torture rooms.

Locate and eliminate the first Harrower and then follow the area search marker to the next one.

Locate and eliminate the second Harrower and then follow the area search marker to the next one.

Locate and eliminate the final Harrower.

Once you have eliminated the three Harrowers, Danilo will ask you to head over to the cathedral for part 3 of the mission.

Part 3
You will be tasked with either:
Solve Locks: The Fanatics put tracking collars on their captives, making it that much harder for anyone to escape. I need to locate the terminals holding the tracking data and run Danilo's data termination program on them.
OR
Repel Enemies: Danilo has instructed me to cause a commotion and clear the cathedral of Fanatics. I need to kick things off by navigating to the top floor of the cathedral and setting off some pre-recorded organ music, then to keep the floor clear of goons.
OR
Defend NPC: Danilo is coming with me this time. I need to stay by his side and defend him from Fanatics while he gathers several pieces of intel.
Part 3 will always end the same way, fighting a mini boss.
The Fanatic Foreman will spawn and you will need to kill him to continue the mission.
Follow the area search marker down to where the store room is. Once you get close enough, the Foreman will enter through the wooden double doors marked below.
This guy packs a punch with his AGL and takes little damage. Although he is non legendary, he does regen.

Part 3 explained:
Solve Locks
Note: The terminals are a level 0 so no perk cards are required however legendary perk card Master Infiltrator might make the process go faster.
Danilo will ask you to find three terminals inside the Cathedral and run a program that will destroy them.

You will be given an area search marker on your HUD, which will turn into a direct map marker when you get close enough to the terminal.
The terminal locations are different every time. They can be found on the first or second floor of the Cathedral, on walls and on desks. Some of the terminals can also be found in the small side offices on the second floor.
Both team leaders and team mates can interact with the terminal.
Wall terminals.

Desktop terminals.

Once you have found and destroyed all three terminals, head towards the stock room where the Foreman spawns (follow the area search map marker on your HUD).
As you are running past, free the labourers that are in the stocks in the middle of the main Cathedral floor or don't.

After you have killed the Fanatic Foreman, Danilo will tell you to escape the Sanctum either the normal way or via his shortcut. There isn't really much of a difference between the two, except the shortcut has less enemies.

You will need to get ready to run for the next part. The additional objective Rescue all the survivors from the storm kicks in the moment that the team leader interacts with the door.

Repel Enemies
Danilo will ask you to create a distraction while some labourers escape.
Follow the direct map marker up into the Cathedral.
You will be using this entrance often to enter the Cathedral.
From the gate where Danilo was standing, walk straight and through the tunnel in front of you. You should see a piece of flooring with a white arrow marked on it on your right. Follow that up and around to your left and keep going up until you are on the ground floor of the Cathedral.

You will need to access the upstairs part of the Cathedral for most of the objectives.
Look for the store room in the below photo and use the crates on the side (or a jetpack) to get up to the beam where the manniquin is and then use the beams to go back and forth between the areas.
The Fanatic Skeptic often spawns up here as well.

Once you have climbed up to the top floor, follow the map marker and activate the organ music to create the distraction.

Once you push the button, the waves of Fanatic enemies will start.
You and your team mates will need to remain within the circle and kill the enemies as they spawn. You will need to hold this postion until the bar in the top right hand corner is full.

Free the labourers that are in the stocks in the middle of the main Cathedral floor and then follow the area search map marker to find and defeat the Fanatic Foreman.

After you have killed the Fanatic Foreman, Danilo will tell you to escape the Sanctum either the normal way or via his shortcut. There isn't really much of a difference between the two, except the shortcut has less enemies.
You will need to get ready to run for the next part. The additional objective Rescue all the survivors from the storm kicks in the moment that the team leader interacts with the door.
Defend NPC
After speaking to Danilo again, he will ask you to follow him and then cover him in 4 different locations inside the Sanctum, while he searches for intel.


You need to remain a minimum of 20 feet away from Danilo at all times, otherwise he will stop moving and the mission will be paused.

Danilo can be healed by Friendly Fire. If he is downed, you can revive him. There is no time limit to revive him and the mission will not fail if you take a while to revive him.

List of weapons that work with the Friendly Fire perk card can be found here.
Once Danilo has gathered information from all 4 locations, he will leave the area and ask you to deal with the Fanatic Foreman.
Once you have killed the Fanatic Foreman, Danilo will tell you to escape the Sanctum either the normal way or via his shortcut. there isn't really much of a difference between the two, except the shortcut has less enemies.

You will need to get ready to run for the next part. The additional objective Rescue all the survivors from the storm kicks in the moment that the team leader interacts with the door.
Additional Objectives:
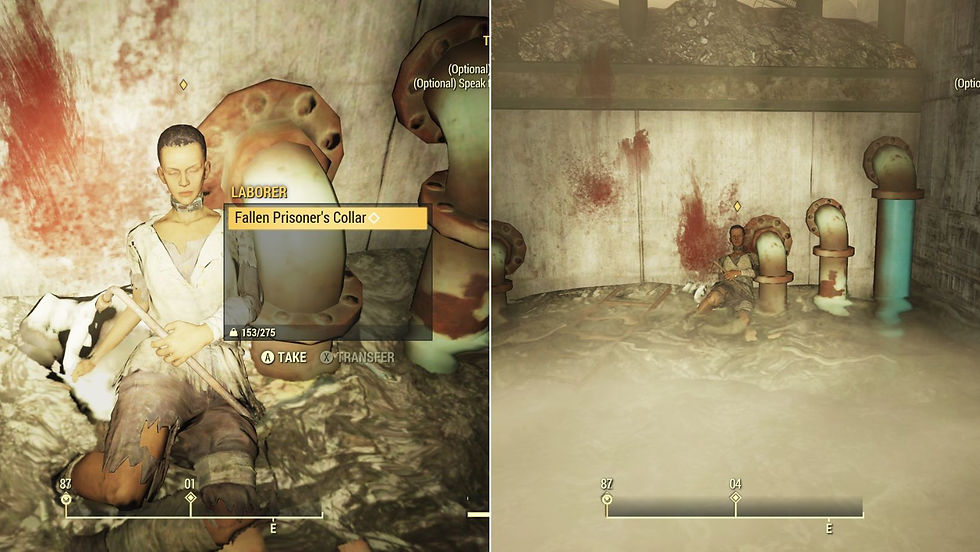
Collect 5 Fallen prisoner collars
This objective is only available during part 2 and part 3. The fallen prisoners can be found in the Sanctum, the Cathedral, the Catacombs and sometimes The Trenches.
There are multiple fixed spawn locations for the bodies, however only 5 of the bodies will spawn a collar in their inventory at one time.

There are no direct or area search map markers for these until you get within 20 feet of them. You will find most of them while just running the main mission however you may need to go back and search for one or two before you move onto the next part of the mission.
Once you are in range, you will have a area search map marker pop up on your HUD.
Once you get within 10 feet of the prisoner, a direct map marker will show on your HUD.

While the team leader or a team mate can collect these collars. Only the team leader can turn them into Ava Rose at the end.

Persuade the Fanatic Skeptic
There are 5 different locations that this objective can spawn in. 3 in the Sanctum/Cathedral area and 2 in the Trench area.
Look for the Fanatic that is wearing a white bandana/cloth head piece.

Note, only the team leader can interact with the Fanatic Skeptic.
This additional objective requires a SPECIALS check to complete. You will need either 8+ Strength, 8+ Endurance, 8+ Intelligence or 8+ Perception to complete it successfully.
If you fail the SPECIAL check then the Skeptic will turn hostile and you will need to kill them, which means you have failed an objective and can only reach tier 2 rewards.
There are no direct or area search map markers for the Fanatic Skeptic until you get within 20 feet of them. You can find them for the most part, while just running the main mission however you may need to go back and search before you move onto the next part of the mission.
Once you are in range, you will have a area search map marker pop up on your HUD.
Once you get within 10 feet of the prisoner, a direct map marker will show on your HUD.

Spawn location guide for the Fanatic Skpetics can be found here.
Rescue all the survivors from the storm
This objective can only spawn in The Trench area.
I can not stress enough how important it is to follow the step by step instructions for this additional objective. If you fail this part then it is the difference between receiving 5 stamps or 8 stamps at the end of the mission.
The survivors health are on a bar and they take a lot of damage from the storm very quickly.
The team leader has to interact with the door first as the Trench is an instanced area and the team leader is the only one who can create it.
Without crowding each other too much, team mates can spam the interact button so the game pulls you throught to the other side as soon as the instance is created.
Once you load out onto the other side of the door, check your HUD. You will see three area search map markers and one direct map marker.
Each survivor has an area search map marker and the direct map marker is for Danilo.

The player with the fastest console/PC i.e. the player who loads out onto the other side of the door first, needs to locate the Feeble Survivor area search map marker and start running towards it.
Ignore the Trogs. They are only there to slow you down. Tank their damage and just keep running.

The Feeble Survivor is the closest NPC to the door. You have 90 seconds (1.5 mins) to find them, speak with them and send them to a safe place before they die.
It is highly recommended that you spam the skip option during the dialogue.

The Middling Survivor is a little furthur away. You have 150 seconds (2.5 mins) to find them, speak with them and send them to a safe place before they die.
The Resilient Survivor is the farthest away. You have 450 seconds (7.5 mins) to find them, speak with them and send them to a safe place before they die.

The survivors will continue to take damage from the storm while you are speaking to them, however they can be healed with Friendly Fire.
The End:
After you have rescued all the survivors; If you are still missing collars at this stage, then they will spawn on bodies in and around The Trench. It's harder to find them out there so do your best to find them all inside first.
Once you have collected all the collars, spoken to the Fanatic Skeptic and rescued the survivors, the team leader needs to return to Ava Rose and turn in the objectives.
After you have completed everything, speak to Danilo and then Lennox to go home and claim your rewards.


Hi, I'm Kat or Duchess
I'm an Australian data miner who writes farming, event and food buff guides for Fallout 76.
I believe that all knowledge and information should be free which is why my guides will never be locked behind a paywall. However, running a website and photo and video editing software does not come cheaply.
So, If you found my guides useful, please consider buy me a ko-fi (coffee) using the link below.
All monies go towards the tools for writing my guides and maybe for an actual cup of coffee or 3 ;)
Alternatively, share my guides with your fellow vault dwellers and help them to survive the wasteland.

Comments